You don't need to spend hundreds of dollars to get a working teleprompter setup. In fact, you can put together something surprisingly effective for under $100 - and in some cases, for free.
This guide breaks down your best options at every price point under $100, from software-only setups to budget beam-splitter hardware. We'll cover what works, what doesn't, and where to spend your money if you're just getting started.
The $0 Option: Software-Only Teleprompter
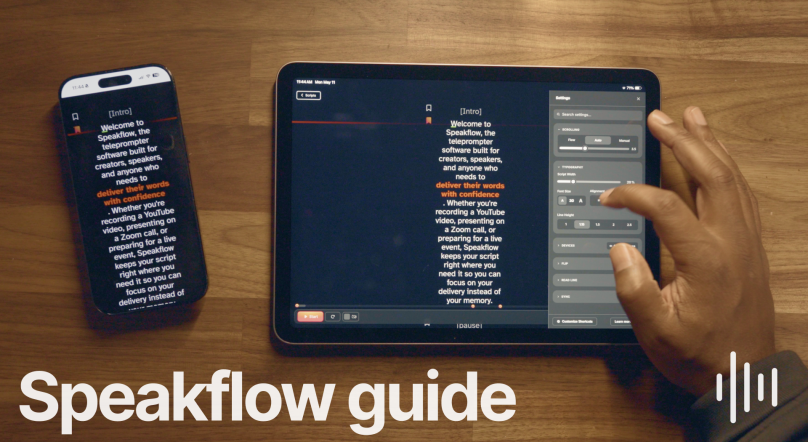
Before you buy any hardware, consider whether you actually need it. A software teleprompter like Speakflow runs in your browser and overlays your script right on screen - no extra gear required.
Here's how it works: you open Speakflow on the same device you're recording with (or a second device positioned near your camera), and your script scrolls at whatever speed you set. You can control it with keyboard shortcuts, a remote, or even let it auto-scroll.
This setup is genuinely good enough for a lot of people. If you're recording Zoom calls, YouTube videos from a webcam, or any situation where your camera is close to your screen, you can maintain decent eye contact without any hardware at all.
Best for: Webcam recordings, video calls, anyone who wants to try a teleprompter before investing in hardware.
Limitations: Eye contact isn't perfect since you're looking at your screen, not through your camera lens. For professional-looking direct-to-camera content, you'll want a beam-splitter (more on that below).
The $20-30 Option: Phone or Tablet + Software
Got an old phone or tablet sitting in a drawer? Mount it right below or above your camera and run Speakflow on it. This is the most underrated budget teleprompter setup out there.
What you need:
- A smartphone or tablet (anything with a browser works)
- A small phone/tablet mount or tripod clamp ($10-20 on Amazon)
- Speakflow or any browser-based teleprompter app
Position the device as close to your camera lens as possible. The closer it is, the better your eye contact looks on camera. If you're using a webcam, stick the phone right above or below it. For a camera on a tripod, mount the phone just above the lens.
If you have an iPad, check out our complete iPad teleprompter setup guide for detailed positioning tips.
Best for: Solo creators who already own a spare device and want better eye contact than a screen-based setup.
The $50-70 Option: Entry-Level Beam-Splitter Teleprompters
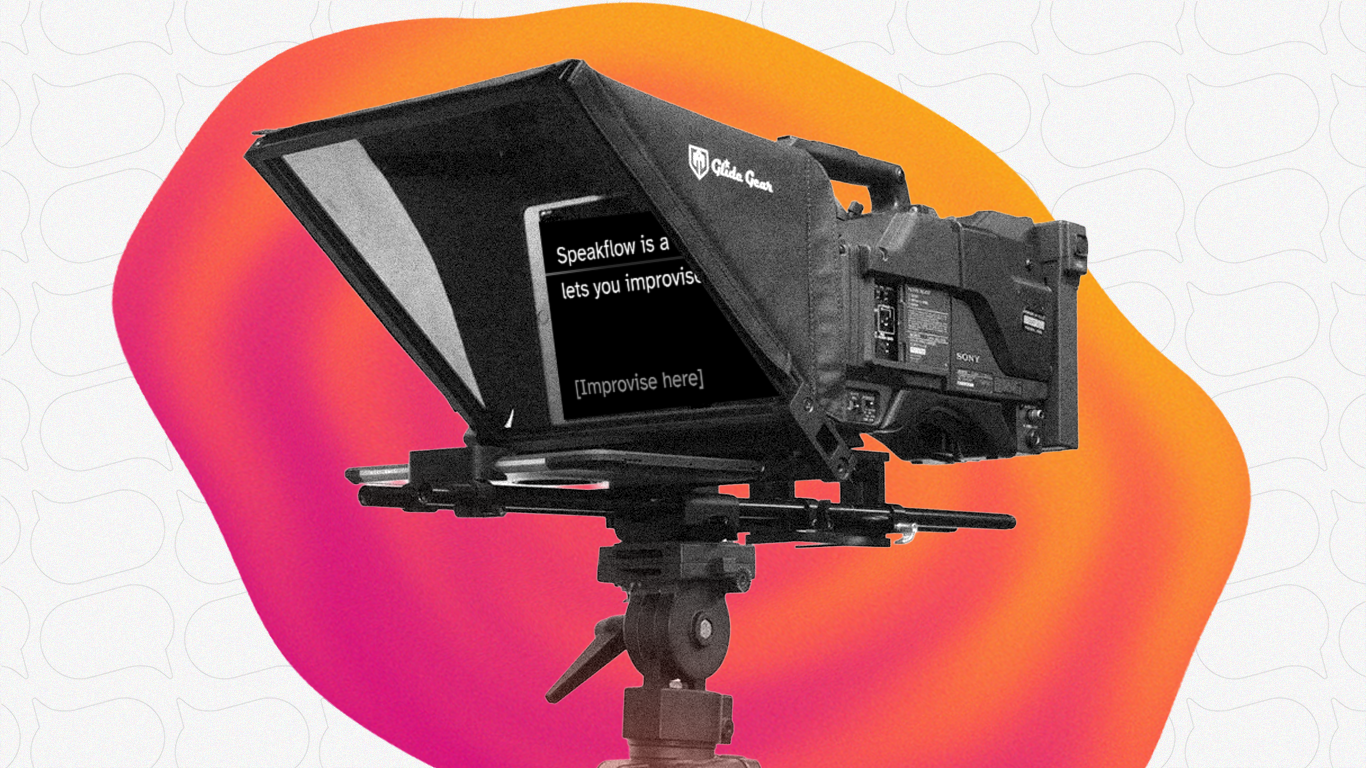
This is where things get interesting. A beam-splitter teleprompter uses a piece of semi-transparent glass angled at 45 degrees in front of your camera lens. Your script reflects off the glass toward you, but the camera shoots right through it.
The result: you're reading your script while looking directly into the lens.
The result: you're reading your script while looking directly into the lens.
At this price point, you're looking at models like the Glide Gear TMP 50 (~$50) and various unbranded options on Amazon in the $40-70 range.
What to expect:
- Plastic construction (lighter, but less durable)
- Smaller beam-splitter glass (usually 6-8 inches)
- Basic lens adapter rings
- Works with smartphones as the script display
The tradeoff at this price is build quality and glass size. Cheaper glass can produce slight ghosting or double images, and smaller glass means you need to keep your phone close - which limits how much script you can see at once.
That said, for the price? These work. If you're testing whether a beam-splitter setup improves your videos, this is a low-risk way to find out.
Best for: Creators who want true through-the-lens eye contact on a tight budget and don't mind some setup fiddling.
The $80-100 Option: The Sweet Spot
This is where we'd recommend most people start if they're serious about teleprompter use. Two models stand out in this range:
Desview T3 (~$99)
The Desview T3 has become one of the most popular budget teleprompters for good reason. It supports tablets and phones up to 10 inches, uses 70/30 beam-splitter glass (the good stuff - 70% of light passes through to the camera, 30% reflects your script), and comes with a Bluetooth remote control.
Key specs:
- Supports devices up to 10 inches
- 70/30 beam-splitter glass
- Bluetooth remote included
- 9 lens adapter rings (fits most camera lenses)
- Folds flat for transport
The remote is a nice touch at this price. Instead of setting a fixed scroll speed, you can pause, speed up, or slow down on the fly - which makes your delivery sound way more natural. Pair it with Speakflow on your tablet and you've got a setup that rivals equipment costing 3-4x as much.
NEEWER Basics X12B (~$95-130)
The X12B is slightly more expensive but brings a couple of notable upgrades. It has a liftable platform that adjusts to center different-sized camera lenses, a 12-inch beam-splitter, and an aluminum alloy build that feels noticeably sturdier than plastic alternatives.
Key specs:
- 12-inch HD beam-splitter glass
- Aluminum alloy construction
- Liftable platform for lens centering
- Bluetooth remote + app control
- No assembly required (unfolds ready to use)
The "no assembly" claim is mostly true - it unfolds and locks into position, which is genuinely convenient compared to models where you're sliding glass panels into slots every time.
If you can stretch your budget slightly past $100, the X12B is probably the better long-term investment. But the Desview T3 at $99 is hard to argue with for the price.
What About DIY Teleprompters?
You'll find YouTube tutorials showing how to build a teleprompter from a picture frame and some black foam board. And honestly? They work.. kind of.
The problem is the glass. Picture frame glass doesn't have the right reflectivity ratio. You'll get a visible reflection of your script on camera, or the script will be too dim to read comfortably, or both. The 70/30 beam-splitter glass in commercial teleprompters exists for a reason - it's specifically designed to reflect enough light for you to read while being virtually invisible to the camera.
You can buy beam-splitter glass separately ($15-30), but by the time you've built a housing for it, you're probably spending $40-50 and ending up with something less reliable than a $50 commercial option. We'd skip the DIY route unless you genuinely enjoy building things.
Don't Forget the Software
Here's something most budget teleprompter guides skip: the software matters just as much as the hardware. A great beam-splitter with bad scrolling software is a frustrating experience.
What to look for in teleprompter software:
- Adjustable scroll speed - You need to match your natural reading pace
- Remote control support - Bluetooth remotes should work seamlessly
- Mirror mode - Beam-splitters flip your text, so the software needs to flip it back
- Font and size control - You need to read comfortably from a few feet away
- Cross-device sync - Write your script on your computer, read it on your tablet
Speakflow handles all of this and runs in any browser, so it works on whatever device you're using as your script display. No app to install, no compatibility issues.
Budget Teleprompter Setup Checklist
Whatever option you pick, here's what you need for a complete setup:
- Camera - Webcam, phone, DSLR, mirrorless.. whatever you've got. If you're using a Logitech webcam, we have a dedicated setup guide for that.
- Teleprompter hardware (optional) - Beam-splitter if you want direct eye contact, or just position a device near your lens.
- Script display device - Phone, tablet, or your computer screen.
- Teleprompter software - Speakflow, or whatever you prefer.
- Tripod or mount - Most beam-splitter teleprompters mount on a standard tripod.
- Remote control - Either the one that comes with your teleprompter, or a separate Bluetooth remote ($10-15).
Total cost for a solid setup: $0 (software only) to ~$100 (Desview T3 + tripod you already own).
Our Recommendation
If you're just starting out, try the free approach first. Use Speakflow on your laptop or a spare device positioned near your camera. Record a few videos. See if a teleprompter actually improves your workflow.
Ready to try it? Give Speakflow a spin - it's free to start and works with any of the hardware setups we covered above.