The Elgato Prompter is one of the best hardware teleprompters you can buy right now. At $280, it's not cheap—but it's a genuine all-in-one solution that eliminates the DIY headaches of tablet mounts and beam splitter glass. We opened one up back when it came out and now that we've had some time with it... well we like it.
This guide covers everything you need to set up the Elgato Prompter with Speakflow: hardware assembly, camera positioning, software configuration, and the workflow tweaks that'll make your recordings smoother.
What's in the Box
Before we dive in, here's what you're working with:
- 9-inch display (1024 x 600 resolution)—bright enough for most lighting setups
- Beam splitter glass with housing
- Step-up ring set for DSLR and mirrorless lenses
- Universal shroud backplate for webcams and action cams
- USB-C cable (USB 3.0)
- Universal mounting bracket
The Prompter weighs about 1.5 lbs without accessories. It's light enough to mount on most tripods without issues, but sturdy enough that it won't wobble during recording.
Step 1: Assemble the Hardware
Assembly takes about 5 minutes if you don't overthink it.
For DSLR or mirrorless cameras:
- Find the step-up ring that matches your lens diameter (common sizes: 52mm, 58mm, 67mm, 72mm, 77mm)
- Screw the ring onto your lens
- Slide the camera through the back of the Prompter housing
- The ring seats into the mounting bracket—you'll feel it click into place
For webcams:
- Use the universal shroud backplate instead of the step-up rings
- Mount your webcam to the backplate using the included bracket
- Slide the assembly into the Prompter housing
Pro tip: If you're using a Logitech C920 or C922, the fit is snug but works well. For larger webcams like the Logitech Brio, you might need to adjust the mounting angle.
Step 2: Connect to Your Computer
The Prompter uses a single USB-C cable for both power and video. Plug it into your Mac or PC, and it should appear as a second display within a few seconds.
If it doesn't show up:
- Try a different USB port (USB 3.0 or higher)
- Check your display settings (System Preferences → Displays on Mac, Settings → Display on Windows)
- Make sure you're using the included cable—some USB-C cables are charge-only
Once connected, you'll see the Prompter listed as a 1024 x 600 external display.
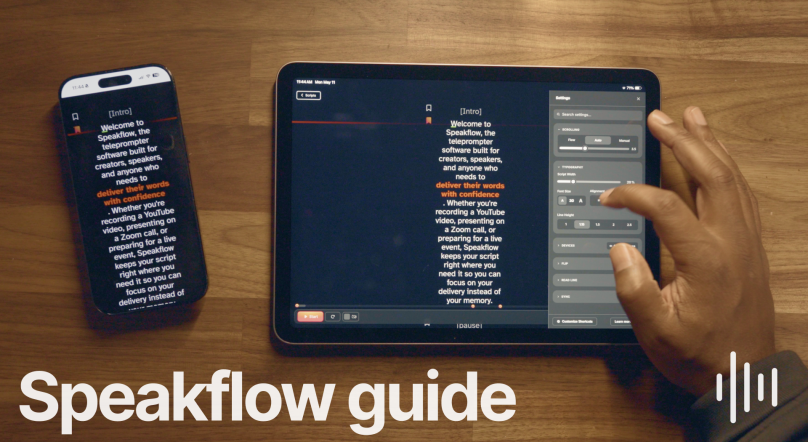
Step 3: Configure SpeakFlow for the Prompter
Here's where Speakflow shines. Since it's browser-based, you don't need to install any special software—just open it on the Prompter display.
Basic setup:
- Open speakflow.com/teleprompter in Chrome or Edge
- Drag the browser window to the Prompter display
- Press F11 (or Cmd+Shift+F on Mac) to go fullscreen
- Paste or type your script
- Adjust font size until it's comfortable to read from your speaking distance
Recommended settings for the Elgato Prompter:
- Font size: 32-42px works well for most setups (2-3 feet from the Prompter)
- Scroll speed: Start at 2-3 and adjust based on your natural speaking pace
- Mirror mode: OFF—the Elgato Prompter's beam splitter handles the flip optically
- Margin: Set comfortable margins so text doesn't run to the edges
Step 4: Position for Natural Eye Contact
This is the part most people rush through—and it shows in their videos.
The goal is to position your camera lens directly behind the center of the Prompter screen. When you read the text, you should be looking straight into the lens.
How to check your alignment:
- Start your camera's preview or open Photo Booth/Camera app
- Look at the center of the Prompter screen
- Check the preview—your eyes should appear to be looking directly at the viewer
- If your eyes seem to drift left, right, up, or down, adjust the camera position
For the best eye contact, position the text you're reading in the center third of the screen. SpeakFlow's scroll keeps your current line centered, which helps maintain that direct eye contact throughout your recording.
Step 5: Dial in Your Lighting
The Elgato Prompter's beam splitter glass can cause reflections if your lighting is off. Here's how to avoid the glare:
- Key light position: 45 degrees to one side, slightly above eye level
- Avoid direct overhead lighting—it reflects off the glass and washes out the text
- If you use a ring light: Position it behind the Prompter, not in front
- Reduce ambient light from windows or overhead fixtures that might hit the glass
If you're seeing the Prompter screen reflected in the beam splitter glass, dim the display brightness in your system settings. The 9-inch screen is bright enough that you can usually drop it to 60-70% without readability issues.
Advanced: Control Scrolling Remotely
Reading and scrolling at the same time takes practice. Here are better options:
Stream Deck integration: If you have an Elgato Stream Deck, you can map keyboard shortcuts to buttons for play/pause and speed adjustments. SpeakFlow responds to standard keyboard controls.
Phone as remote: Open SpeakFlow on your phone and your computer. Link them together, and you can control scrolling from your phone while the Prompter displays the script.
Foot pedal: USB foot pedals that send keyboard commands work with SpeakFlow. Map the pedal to spacebar for play/pause.
Troubleshooting Common Issues
Text appears mirrored: Make sure mirror mode is OFF in SpeakFlow. The Prompter's beam splitter handles the optical flip—you don't need software mirroring.
Display not detected: Try unplugging and reconnecting the USB-C cable. If that doesn't work, restart your computer with the Prompter connected.
Text too small/large: Use SpeakFlow's font size slider. For a 9-inch display at arm's length, 36-40px is usually the sweet spot.
Camera doesn't fit: For larger camera bodies, you may need to remove the lens hood or use the universal shroud backplate with an adapter.
Glare on the glass: Reposition your lights or dim the Prompter's display brightness.
Why This Setup Works
The Elgato Prompter combined with SpeakFlow gives you a professional teleprompter setup without the complexity of traditional systems. You get:
- True eye contact—your camera sits directly behind the text
- No app switching—Speakflow runs in your browser alongside your recording software
- Remote control options—phone, Stream Deck, or foot pedal
- Works with any camera—DSLR, mirrorless, or webcam
The $280 price tag is real money, but if you're creating videos regularly—for YouTube, courses, or client work—it pays for itself in time saved and quality gained.
Next Steps
Once your hardware is set up, the real skill is learning to deliver naturally while reading. A few tips:
- Practice reading out loud before you hit record
- Write your scripts the way you talk, not the way you write
- Use Speakflow's script timer to check your pacing before recording
Ready to try it? Open SpeakFlow and run through your first script on the Prompter. The learning curve is about 15 minutes—after that, you'll wonder how you made videos without it.