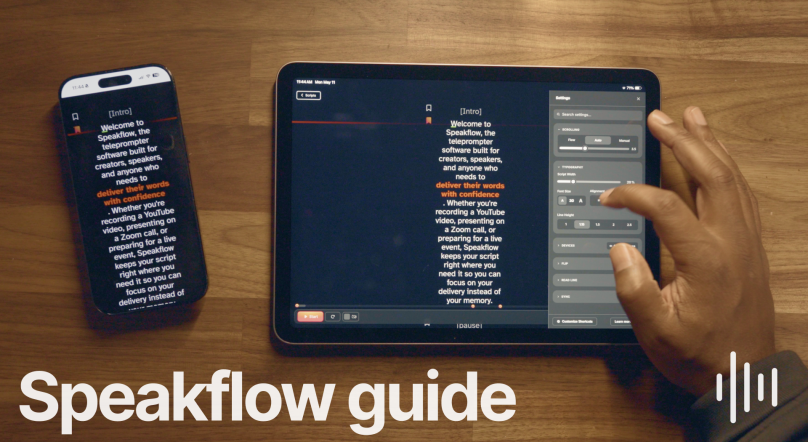
If you've ever tried to adjust your teleprompter speed while recording, you know the struggle. Your hands are in frame, you're mid-sentence, and suddenly you need to slow things down. Reaching for a keyboard breaks your flow (and your eye contact).
The Elgato Stream Deck fixes this. With a dedicated button panel at your fingertips -- or a foot pedal at your feet -- you can control Speakflow without touching your computer.
Why Stream Deck Works So Well with Teleprompters
Stream Deck is essentially a customizable button box. Each key can trigger keyboard shortcuts, open apps, or run complex macros. For teleprompter work, that means:
- One-touch start/stop instead of hunting for the spacebar
- Visual speed controls so you always know your current setting
- Mode switching between Auto, Manual, and Flow modes
- Hands-free operation when paired with Stream Deck Pedal
The real magic? You can position the Stream Deck (or pedal) wherever makes sense for your setup -- under your desk, next to your camera, wherever keeps your hands free and your eyes on the lens.
What You'll Need
- Elgato Stream Deck (any model works -- Mini, MK.2, XL, or the + with dials)
- Stream Deck software (free from Elgato)
- Speakflow account (the browser-based teleprompter)
Optional but nice:
- Stream Deck Pedal for truly hands-free control
- Stream Deck + if you want the dials for smooth speed adjustment
Step 1: Learn Speakflow's Keyboard Shortcuts
Before setting up Stream Deck, you need to know what you're mapping. Speakflow uses simple keyboard shortcuts that work in any browser:
Essential Controls:
- Spacebar -- Start/stop scrolling
- R -- Restart from the beginning
- 1-9 -- Set scroll speed (1 = slowest, 9 = fastest)
- 0 -- Slowest possible crawl
- + -- Increase speed by 1
- - -- Decrease speed by 1
Mode Switching:
- F -- Flow mode (voice-activated scrolling)
- A -- Auto mode (constant speed scrolling)
- M -- Manual mode (you control every scroll)
Navigation:
- Up arrow -- Go up one line
- Down arrow -- Go down one line
Display:
- [ -- Decrease text width
- ] -- Increase text width
You can also customize these shortcuts in Speakflow's settings if you have conflicts with other software.
Step 2: Set Up Your Stream Deck Profile
Open the Stream Deck software and create a new profile for teleprompter work. I like naming mine "Teleprompter" or "Recording" so it's easy to find.
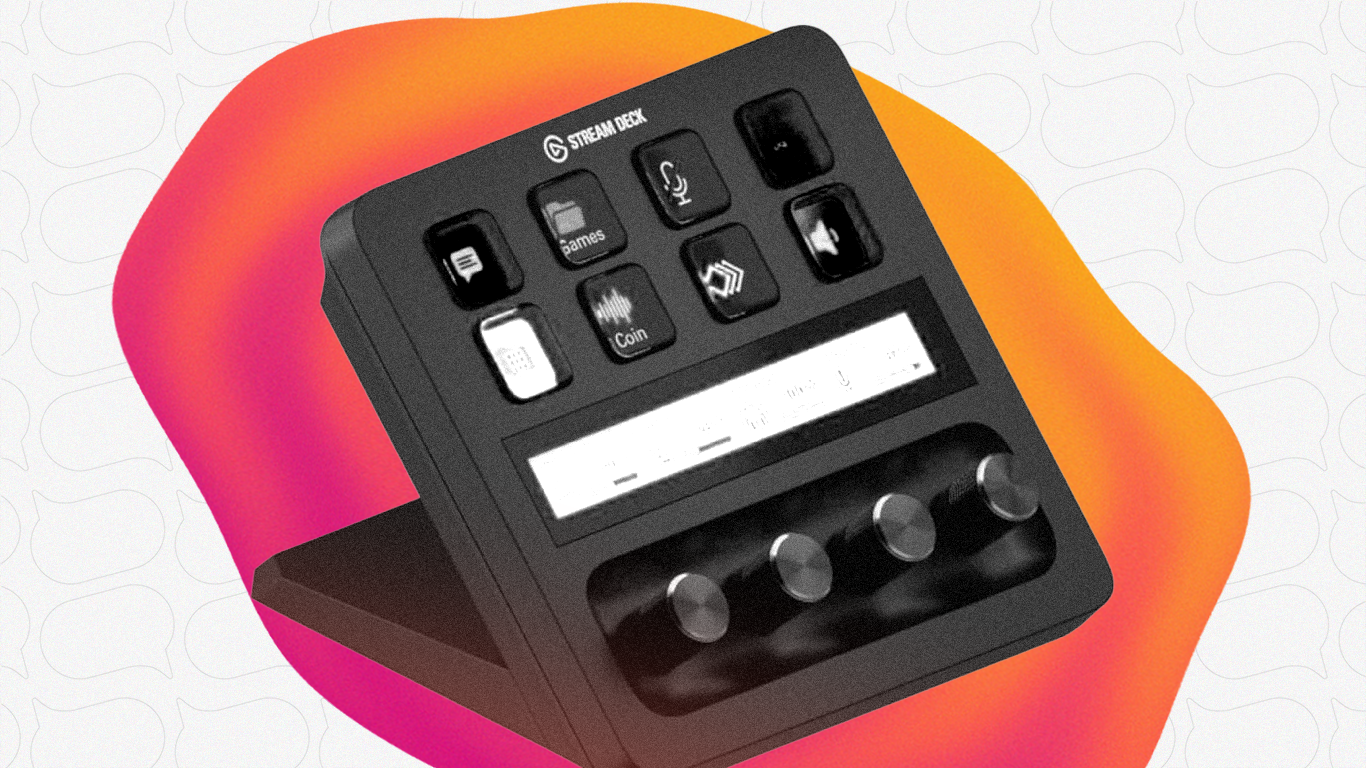
The Basic Setup (6 Buttons)
For the Stream Deck Mini or a simple setup, here's a clean 6-button layout:
- Play/Pause - Hotkey: Spacebar
- Restart - Hotkey: R
- Slower - Hotkey: -
- Faster - Hotkey: +
- Auto Mode - Hotkey: A
- Flow Mode - Hotkey: F
To add each button:
- Drag "Hotkey" from the right sidebar to an empty key
- Click the button to configure it
- Press the key you want to map (like Spacebar)
- Add a title and icon
The Advanced Setup (15 Buttons)
If you have a larger Stream Deck, you can get more granular:
Row 1: Speed Presets - Speed 1, Speed 3, Speed 5, Speed 7, Speed 9
Row 2: Controls - Play/Pause, Restart, Slower, Faster, Manual Mode
Row 3: Modes & Navigation - Flow Mode, Auto Mode, Up Line, Down Line, Width +
Why speed presets? Instead of tapping "faster" five times to get from 3 to 8, just hit the "Speed 8" button once. Much cleaner during recording.
Step 3: Add Visual Feedback (Optional but Recommended)
Stream Deck buttons can change icons, which is helpful for knowing your current state at a glance.
For the play/pause button, you can use a "Multi Action Toggle" instead of a simple hotkey:
- State 1: Shows "Play" icon, triggers Spacebar
- State 2: Shows "Pause" icon, triggers Spacebar
This way, your button visually indicates whether the teleprompter is running or stopped.
You can download free icon packs from the Elgato Marketplace or create your own. Simple text labels work fine too -- "▶" and "⏸" are perfectly readable.
Step 4: Position Your Stream Deck
Where you put the Stream Deck matters. A few options:
Under your monitor: Easy to see and reach, but might require looking away from the camera.
On your desk, angled toward you: The Stream Deck stand keeps it visible while you're looking at the camera.
Mounted near your camera: Some creators mount it just below their teleprompter so they never have to look away.
On the floor (Pedal): The Stream Deck Pedal is perfect for start/stop and speed control. More on this below.
The goal: control your teleprompter without your hands entering the frame or your eyes leaving the lens.
Using the Stream Deck Pedal for Hands-Free Control
If you want truly hands-free operation, the Elgato Stream Deck Pedal is worth considering. It's a three-pedal setup that connects via USB and works with the same Stream Deck software.
My recommended pedal mapping:
- Left pedal: Slower (-) -- Natural "less" association
- Center pedal: Play/Pause -- Most-used control front and center
- Right pedal: Faster (+) -- Natural "more" association
With this setup, you can start your script, adjust speed on the fly, and pause for a retake -- all without moving your hands.
Some creators use the pedals differently:
- Left = Restart, Center = Play/Pause, Right = Next section marker
- Left = Manual scroll up, Center = Play/Pause, Right = Manual scroll down
There's no wrong answer. Set it up for how you actually record.
Combining Stream Deck + Pedal
For the ultimate setup, use both:
Stream Deck handles mode switching, speed presets, and restart
Pedal handles play/pause and real-time speed adjustments
Pedal handles play/pause and real-time speed adjustments
This way, you set your mode and approximate speed with Stream Deck before recording, then make micro-adjustments with your feet during the take. Your hands stay visible (or on gestures) the whole time.
Tips for a Smooth Recording Workflow
1. Create a "Recording Start" macro
Use Stream Deck's Multi Action feature to chain multiple actions:
- Switch Speakflow to Flow mode
- Wait 1 second
- Press Play
One button, and you're rolling.
2. Keep speed presets visible
If you have the screen real estate, having dedicated buttons for speeds 3, 5, and 7 lets you jump to a known pace instantly. Better than guessing how many times you've hit "faster."
3. Practice the muscle memory
Spend 10 minutes just playing with the controls before you record anything important. You want button presses to become automatic so you're not thinking about them during your actual performance.
4. Consider Flow mode
Speakflow's Flow mode uses voice recognition to scroll the script as you speak. It's surprisingly good, and it means you might not need speed controls at all. Just play/pause and restart.
Troubleshooting Common Issues
Hotkeys aren't working?
Make sure Speakflow's browser tab is focused (click on it) before pressing Stream Deck buttons. Hotkeys only work when the target app is in the foreground.
If you're using overlay mode with another app focused, you'll need to switch focus to the Speakflow window first. Some creators use a macro: activate Speakflow window → send hotkey → switch back.
Speed changes feel jerky?
If you're using the Stream Deck + with dials, you might be changing speed too quickly. The dials send rapid keypresses when turned, which can jump you from speed 2 to speed 8 in half a rotation. Consider mapping dial turns to single +/- presses with a slight delay, or just use buttons instead.
Pedal clicks are audible in recording?
The Stream Deck Pedal does make a soft click. If your microphone picks it up:
- Position the pedal further from your mic
- Use a directional mic pointed at your face, not the floor
- Add a small rug under the pedal to dampen vibration
What About Elgato's Camera Hub?
If you're using the Elgato Prompter hardware (their dedicated teleprompter device), there's a native Camera Hub plugin that adds teleprompter-specific controls to Stream Deck.
Speakflow doesn't have a dedicated Stream Deck plugin since it's browser-based and works with any app that supports keyboard shortcuts. The hotkey approach is actually more flexible -- you can control Speakflow from any device, not just ones with specific plugins.
Quick Reference: My Recommended Stream Deck Layout
Here's a simple, clean setup that covers 90% of what you'll need:
Top row: Restart | ◀ Slower | ▶ Play/Pause | Faster ▶
Bottom row: Flow | Auto | Manual | Speed 5
Eight buttons. Everything you need. Nothing you don't.
Ready to Level Up Your Recording Setup?
The combination of Speakflow's browser-based teleprompter and Stream Deck's physical controls creates a professional recording experience without the complexity (or cost) of traditional teleprompter systems.
Start with the basic play/pause and speed controls. Add more as you figure out what your workflow actually needs.
New to Speakflow? Try it free at speakflow.com/teleprompter. You can test the keyboard shortcuts without a Stream Deck to see how the controls feel.
Want to master the shortcuts first? Check out our complete keyboard shortcut reference and scroll mode guide.
Related: If you're building a home studio setup, you might also want to check out our guide on how to read a script while looking into the camera -- it pairs well with the hands-free control setup we covered here.