Why Your iPad Makes the Perfect Teleprompter
You already own the most versatile teleprompter display on the market - you just haven't set it up yet.
iPads have sharp, bright screens that are readable in almost any lighting condition. They're portable enough to throw in a bag for on-location shoots. And because they run a real browser, you can use web-based teleprompter software like Speakflow without downloading anything.
The best part? You don't need expensive dedicated hardware. A basic iPad, a stand, and the right software is all it takes to look like you're speaking naturally on camera - even when you're reading every word.
This guide covers everything: which iPad models work best, how to mount it properly, software setup, and the pro techniques that separate amateur videos from professional ones.
What You Need to Get Started
Here's the minimum setup:
- An iPad (any model from the last 5-6 years works fine)
- A stand or mount (options from $15 to $300+ depending on your setup)
- Teleprompter software (browser-based like Speakflow or a native app)
- Your script
That's it for basic use. If you're recording video, you'll also want:
- A camera or smartphone for recording
- Good lighting (to avoid screen glare)
- Optionally, a beam splitter rig if you want to read the script while looking directly into the camera lens
Which iPad Models Work Best?
Any iPad made in the last several years will work. But some are better than others:
Best options:
- iPad Air (10.9") - The sweet spot. Big enough to read comfortably, light enough to mount easily. Great brightness.
- iPad Pro 11" - Excellent screen brightness and ProMotion (120Hz) for smoother scrolling. Overkill for most people, but nice if you already have one.
- iPad (10th gen, 10.9") - The budget option that still delivers. Plenty bright, good size.
Works fine:
- iPad Mini - Great for travel or tight spaces, but the smaller screen means you need to stand closer or use larger text.
- iPad Pro 12.9" - Almost too big. Harder to mount, heavier, and unnecessary for teleprompter use unless you're reading from across a stage.
- Older iPads - Still work, but dimmer screens can be harder to read in bright environments.
Screen brightness matters more than you'd think. If you're shooting outdoors or in a bright studio, you'll want at least 500 nits. Modern iPads range from 500-600 nits (standard) to 1000+ nits (Pro models with XDR).
Software: Browser-Based vs Native Apps
You have two main options for teleprompter software on iPad.
Browser-Based Teleprompters (Recommended)
Speakflow runs entirely in Safari or Chrome. No download required - just open the website and start prompting.
Why this matters:
- Works on any device - Your script syncs between iPad, phone, laptop, whatever you have
- Remote control built in - Control scroll from a second device (your phone, a laptop, even an Apple Watch)
- No storage concerns - Scripts live in the cloud
- Always up to date - No waiting for app updates
Speakflow also has features like voice-activated scrolling (it listens and follows along as you speak), overlay mode for virtual meetings, and team collaboration for sharing scripts.
Native Apps
Apps like Teleprompter Premium, PromptSmart Pro, and Video Teleprompter Lite work offline and offer built-in recording. They're fine options, especially if you need to work without internet access.
The downsides: they're locked to iOS, scripts don't sync across platforms easily, and you're dependent on app updates for new features.
For most people, a browser-based solution offers more flexibility.

Mounting Your iPad: Three Approaches
How you mount your iPad depends on your recording setup and budget.
Option 1: Simple Stand (Best for Beginners)
The easiest approach: put your iPad on a stand next to or just below your camera.
Pros:
- Cheap ($15-50)
- Fast to set up
- Works with any camera
Cons:
- You're not looking directly at the camera lens - your eye line will be slightly off
- Fine for casual videos, noticeable in professional work
Good stands for this setup:
- Tablet floor stand - Adjustable height, positions iPad at eye level near your camera
- Desk clamp mount - Attaches to your desk, keeps iPad stable near your webcam
- Tripod with tablet adapter - Use a standard tripod with an iPad mount attachment
Position the iPad as close to the camera lens as possible. The closer it is, the more natural your eye contact will appear.
Option 2: Beam Splitter Teleprompter (Professional Look)
A beam splitter uses angled glass to reflect your iPad's screen in front of the camera lens. You read the text while looking directly into the camera - viewers can't tell you're reading.
This is how news anchors, politicians, and YouTubers with polished delivery do it.
Pros:
- Direct eye contact with camera
- Professional results
- Your audience has no idea you're reading
Cons:
- More expensive ($100-500+ for the rig)
- Takes up more space
- Requires setup time
Popular iPad-compatible beam splitter rigs:
- Glide Gear TMP 100 (~$100-150) - Budget option, fits tablets up to 10.5"
- ikan PT-ELITE (~$200-300) - Solid mid-range, supports larger tablets
- Elgato Prompter (~$280) - Premium build quality, designed for webcams and DSLRs. See our Elgato Prompter setup guide for detailed instructions.
- Prompter People Flex Plus (~$400+) - Professional grade for serious productions
Most beam splitter rigs require you to flip your text horizontally (mirror mode). Speakflow and most teleprompter apps have a button for this.
Option 3: Overlay for Virtual Meetings
If you're on Zoom, Google Meet, or Microsoft Teams, you don't need a physical teleprompter setup at all.
Speakflow's overlay mode puts a transparent text window on top of your screen, right near your webcam. You read your script while appearing to look at the camera (or close to it).
This works on laptops and desktops. But if you want to use your iPad as the overlay display, you can use Sidecar (to extend your Mac screen to iPad) or just have your iPad on a stand next to your laptop.
For more on virtual presentations, check out how to use a teleprompter for Zoom.
Lighting Considerations
Your lighting setup affects both your video quality and how easily you can read the teleprompter. Get this wrong and you'll either have a washed-out screen or harsh shadows on your face.
Avoiding Screen Glare
The number one lighting mistake: pointing a key light directly at your iPad. The screen becomes a mirror, reflecting the light source back at you and making text impossible to read.
Instead:
- Position lights at 45-degree angles - Classic three-point lighting works perfectly. Your key light and fill light should illuminate your face without hitting the iPad screen directly.
- Keep lights above the iPad - If using a ring light, position it above your iPad rather than behind it. This illuminates your face while the iPad stays in shadow.
- Use diffused lighting - Soft, diffused light creates fewer harsh reflections than direct bulbs. Softboxes and LED panels with diffusion work better than bare bulbs.
Screen Brightness vs Room Brightness
Your iPad competes with ambient light. In a bright room, you'll need to crank screen brightness to maximum. In a dim room, you can lower it - which also helps the screen blend into the background on camera.
If you're using a beam splitter rig, the iPad screen won't appear in the final video anyway. But if you're reading from a stand beside the camera, a very bright screen can create noticeable light spillover on your face. Test with your actual recording setup.
Matte Screen Protectors
If glare remains an issue after adjusting lights, consider a matte (anti-glare) screen protector. They reduce reflections significantly. The trade-off: slightly reduced color vibrancy and sharpness. For teleprompter use, this trade-off is usually worth it.
Step-by-Step: Setting Up Your iPad Teleprompter
Here's the practical walkthrough.
1. Choose Your Mounting Position
Decide where your iPad will go relative to your camera:
- Beam splitter - iPad sits below or beside the rig, reflects onto glass in front of lens
- Stand beside camera - Position iPad as close to the lens as possible, just above or below
- Stand for virtual meetings - iPad sits near your laptop webcam or external camera
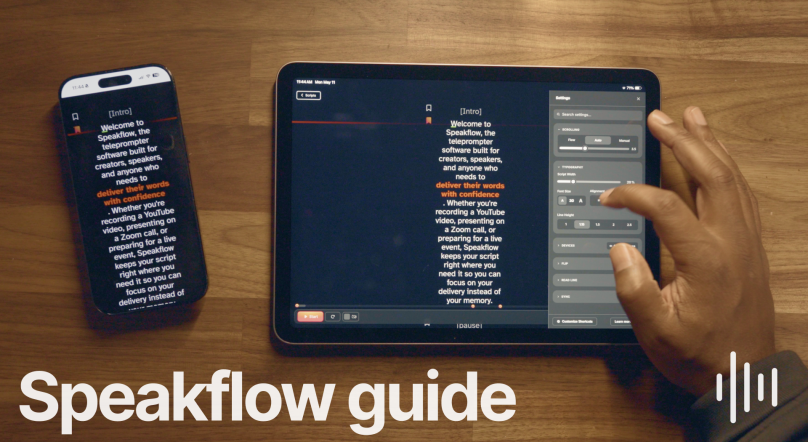
2. Set Up Speakflow
- Open Safari on your iPad and go to speakflow.com/teleprompter
- Create a free account or log in
- Create a new script or paste in your existing text
- Hit the play button to enter teleprompter mode
3. Adjust Your Settings
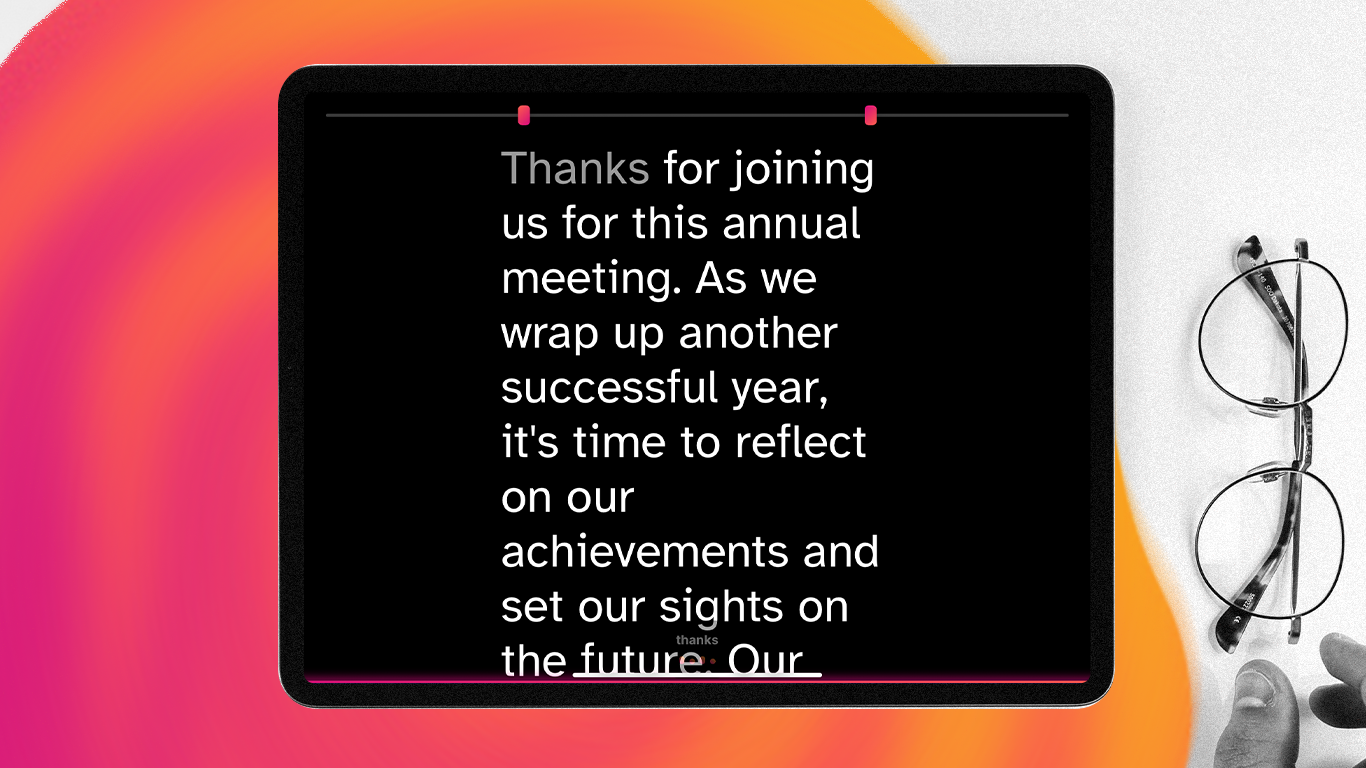
Before you record, dial in these settings:
- Text size - Big enough to read comfortably at your distance. Err on the side of larger.
- Scroll speed - Match your natural speaking pace. Practice a few times to find your rhythm.
- Margins - Wider margins keep text in the center, making it easier to maintain eye contact with the camera.
- Mirror mode - Enable if using a beam splitter rig. Disable for direct reading.
4. Set Up Remote Control (Optional but Recommended)
Controlling scroll from a second device means you don't have to touch the iPad during recording.
With Speakflow:
- Log into the same account on your phone or laptop
- Open the same script
- Use that device as a remote - start, stop, adjust speed
You can also use keyboard shortcuts (spacebar to pause, arrow keys for speed) if you have a Bluetooth keyboard connected to your iPad.
5. Position and Test
Before the real recording:
- Record a 30-second test clip
- Watch it back - are your eyes tracking naturally? Is the scroll speed right?
- Adjust text size, speed, and iPad position as needed

Pro Tips for Natural Delivery
Reading from a teleprompter looks robotic if you're not careful. Here's how to avoid that.
Don't Read Word by Word
Amateur teleprompter users read each word as it appears. Pros read ahead - they glance at the upcoming phrase, then look at the camera and speak it naturally.
Practice reading 3-4 words ahead of what you're saying. It feels weird at first, then becomes second nature.
Write for Speaking, Not Reading
Scripts written for the page sound stiff when spoken. Use:
- Shorter sentences
- Contractions (you're, it's, don't)
- Natural pauses marked in the script
- Words you'd actually say out loud
If you need help writing conversational scripts, check out our video script guide.
Mark Your Script
Add cues directly in your text:
- [PAUSE] - Remind yourself to breathe
- [SLOW] - For important points
- Bold key words - Emphasize naturally
- Line breaks - Group thoughts into readable chunks
Practice Out Loud
Read through your entire script at least once before recording. You'll catch awkward phrasing, tongue-twisters, and timing issues.
Common Problems (and How to Fix Them)
Screen Glare
Problem: Light reflecting off the iPad screen makes it hard to read.
Fix: Adjust your lighting angle so lights aren't pointing directly at the iPad. Use a matte screen protector if glare persists. Position the iPad at a slight angle rather than perfectly vertical.
Text Too Small or Too Large
Problem: You're squinting or your eyes are darting around the screen.
Fix: Increase text size until you can read comfortably without straining. It's better to have fewer words on screen that you can read easily than cramming in text.
Scroll Speed Doesn't Match Your Pace
Problem: You're racing to keep up, or waiting for the text.
Fix: Use Speakflow's voice-activated scrolling (Flow mode) - it listens and follows your pace automatically. Or practice adjusting manual scroll speed until it feels natural.
Eye Contact Looks Off
Problem: On playback, you look like you're reading instead of speaking to viewers.
Fix: Move the iPad closer to the camera lens. If using a stand, position it immediately above or below the lens - not off to the side. If eye contact is critical, invest in a beam splitter rig.
iPad Keeps Dimming
Problem: Auto-brightness or auto-lock kicks in mid-recording.
Fix: In Settings > Display & Brightness, disable Auto-Brightness. In Settings > Display & Brightness > Auto-Lock, set it to "Never" (remember to change this back later to save battery).
Real-World Use Cases
Different scenarios call for different setups. Here's what works best for common use cases.
YouTube and Pre-Recorded Video
For talking-head videos, a beam splitter rig gives you the most professional results. You can read naturally while maintaining perfect eye contact. Record multiple takes, keep the best one.
If budget is tight, a simple stand works fine - just position your iPad directly above or below the camera lens. The slight eye-line offset is barely noticeable in casual YouTube content.
Recommended setup: Beam splitter rig + external camera or webcam + Speakflow with remote control on phone
Zoom, Teams, and Virtual Meetings
Overlay mode is your friend here. Use Speakflow's transparent overlay on your laptop, positioned near your webcam. Your script floats on screen while you present.
If you need a larger text display, set up your iPad on a stand right next to your laptop screen. Glance at it naturally - viewers are used to presenters occasionally looking at notes.
Recommended setup: Speakflow overlay mode on laptop, or iPad on desk stand near webcam
Live Events and Presentations
For keynotes and stage presentations, the iPad becomes a confidence monitor. Set it on a lectern or small stand where only you can see it. Larger venues might warrant an iPad Pro 12.9" for visibility from a distance.
Use large text size and slower scroll speed. You'll be glancing down rather than staring at the screen, so each glance needs to capture your place quickly.
Recommended setup: iPad Pro or Air on lectern, Speakflow with remote control or voice-activated scrolling
On-Location and Run-and-Gun
Portability matters. A folding tablet stand and your existing iPad is all you need. No bulky beam splitter rig - just position the iPad near the camera on a lightweight stand or tripod mount.
Battery life becomes important for longer shoots. Keep your iPad charged and consider bringing a portable battery pack for all-day location work.
Recommended setup: Portable tablet stand + iPad + Speakflow (works offline once loaded)
Podcasts and Interview Shows
For hosts who need to hit specific talking points, an iPad off to the side works well. It shouldn't dominate your attention - you're having a conversation, not reading a script. Use bullet points instead of full sentences, and only glance when you need to.
Speakflow's bookmark feature helps here: mark your key points and jump between them rather than scrolling continuously.
Recommended setup: iPad on desk stand to the side, Speakflow with bookmarked sections
Beyond the Basics
Once you've nailed the fundamentals, explore these advanced techniques:
- Voice commands - Speakflow can respond to voice cues like "next" or "back" to jump between sections
- Team scripts - Share scripts with co-presenters who can follow along or control the prompt from their own devices
- Bookmarks - Mark sections in your script for quick navigation during long recordings
- Recording takes - Use Speakflow's built-in recording to capture directly, then edit out mistakes later
For editing tips, see how Speakflow and Recut work together to speed up your workflow.
Get Started
You don't need a studio setup or expensive hardware to look polished on camera. Your iPad, a basic stand, and Speakflow can get you recording professional-looking videos today.
Start with the simple stand approach - you can always upgrade to a beam splitter rig later once you've gotten comfortable with teleprompted delivery.
Try Speakflow free and turn your iPad into a teleprompter in the next five minutes.