A step-by-step guide for using Speakflow in a live presentation setting.
live-teleprompter-presentations.png1.95 MB
Delivering Live Presentations Using Speakflow
The teleprompter is meant to keep you on track and on topic during your talk, so let’s walk through how to achieve that first. Then, we’ll look into tips and tricks specifically for a webinar versus an in-person audience presentation.
Step One: Setting Up Manual Mode
Our goal is to use Manual mode with Remote Sync. This combination will give you full control of your live presentation without the need to start and stop, in any ambiance, at most any distance.
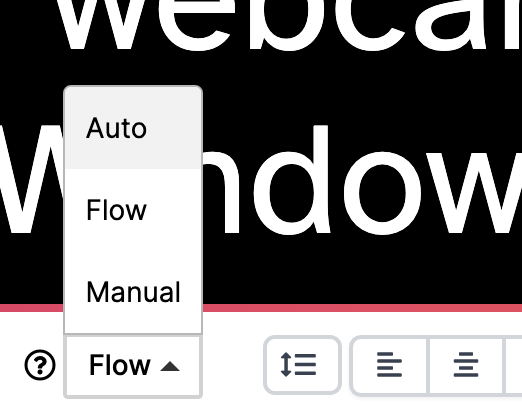
If you’re unfamiliar with the different presentation scroll modes on offer, there are three; auto, flow (voice-recognition), and manual. We love the idea of everyone using the magic of voice-recognition for everything, but we live in a world with variable internet-connections, noisy rooms, and unreliable microphones. Live presentations require the kind of complete control that only Manual mode offers, and so that’s what we’ll be using.
Switching Modes
Look for the scroll mode dropdown and select Manual to set the scroll mode.
Manual mode allows you to scroll the script as if you were scrolling any text document using your mouse scroll wheel, or your finger on a mobile device. The true power of this simple scroll mode is in combination with mobile device syncing.
Step Two: Syncing a Mobile Device
The reason we use mobile device syncing is simply to give ourselves remote control. You might have seen people give a talk with a small clicker to navigate their slides, this is essentially the same thing for our script.
Automatically Sync with a Logged in Device All you need to do is log in to Speakflow on both devices. Once you’re logged into both, you can open the same script into presentation mode on each device. You’ll immediately see a notification telling you that the devices have synced. With our devices synced, we can now control our teleprompter and all its settings without having to interact with our computer or mounted teleprompter.
Step Three: Webinar Versus In-Person Talk
Presenting a webinar and an in-person talk are two entirely different things, despite us using a similar setup for both. Let’s clarify these differences so that you’re prepared to present no matter the situation.
Presenting a Live Webinar
Webinars are a fancy term for most any live-presentation done over the web. The term "webinar" is a blend of "web" and "seminar." In a webinar, participants can join from anywhere with an internet connection, using their computers, smartphones, or other internet-enabled devices.
With our remote control setup we’re on our way to a solid live presentation, but here are some extra suggestions that might work for you if you’re giving a webinar specifically.
Consider Using Overlay
One difficulty of giving a live presentation online is keeping an eye on the people you’re speaking to without navigating back and forth between your script and your call, and without turning your head to look at multiple monitors. We offer a built-in solution to this problem which we call “overlay”.
Overlay allows you to select a window on your computer (such as a zoom call) so that it appears beneath your script like a transparent screen.
Utilize Your Computer’s Windows
It’s easy to forget that we can always resize the windows on our computer to suit our needs, they don’t always have to be fullscreen. We’ve found one arrangement in particular that can be incredibly useful while using Speakflow. Screenshot 2024-02-06 at 1.14.49 PM.png5.8 MB
Simply resize the window so that it is at the top of the screen (close to your webcam), and scale it down vertically so that you can only see 2-3 lines of your text. You may want to play with your font size settings to get your script to a easy-to-read size for your particular situation.
This will leave room on your screen for your conference call. Additionally, the positioning of the window near your webcam will help you maintain eye contact with your audience.
If auto-sync (logged in on both devices) is getting in your way, try using remote control via public link as described above in step two for one-way control.
Presenting to an Audience In-Person
Let’s be honest, the difference between giving a webinar versus an in-person presentation is huge. There are jitters we associate with being in front of a crowd. Jitters fueled by the rumble of a chattering audience, all staring at your full-body language, and sometimes straight into your soul it feels. A teleprompter is a tool to relieve some of those jitters, but it won’t do all the work. The true key to a good live talk is entirely practice. Luckily, we can help with that.
How to Practice with Speakflow
First follow all the steps of this guide so that you have a presentation going in manual mode with a remote control in your hand.
Second, record yourself giving your speech. Speakflow has a built-in recording feature that will store videos associated with the presented script for easy organization.
Third, review the footage. You’ll be surprised how much improvement you’ll internalize simply by watching yourself give your presentation. After a few repetitions of this process, the act of not only presenting the speech, but also watching yourself improve, will help more than you'd guess before trying this process for yourself.
Step Four: Bookmarks for Quick Navigation
Typically, we recommend using bookmarks for long-form recordings. They’re helpful for things like finding chapters in an audiobook recording, or for video recordings with various sections. However, we’ve also found bookmarks to be a handy way of quickly navigating speech notes during live presentations.
Adding Bookmarks wvnurgylxvg53qxq9zoy.gif28.34 MB
You can add a bookmark directly from the presentation screen by hovering over any paragraph in your script and clicking on the bookmark icon in the upper-left corner of that bookmark. You can also add bookmarks manually in the script editor by typing [bookmark], brackets included. image.png174.35 KB
These bookmarks will show up on the left hand side of the screen as handy orange buttons that will instantly navigate to the bookmarked section of your text.
During a live presentation you may find the need to revisit an earlier section of your script quickly without scrolling back through your script. With a little practice, bookmarks can turn your script into a virtual note card, so that you can give your speech extemporaneously or in an impromptu order.
In summary, if you want to make giving live presentations easier on yourself follow these steps. Give yourself more freedom by setting your teleprompter to manual mode and syncing to a mobile device for remote control. Consider the differences between a live presentation that takes place in person versus on the web. Use our video recording features to practice delivering your speech (most important step). Finally, consider using bookmarks in order to navigate your speech on the fly, or to format it for impromptu or extemporaneous speaking. Good luck on your speech!